Classroom LEGO Wall

What do you do with a chalkboard that has writing and drawings that are permanently showing and cannot be removed? Cover it with a LEGO Wall, of course!! First of all, the answer to your question is: yes, we do have chalkboards. My classroom has the distinct pleasure of having 3 sections of chalkboard and a small portable dry erase whiteboard on wheels. The section being used for this project was not in use at all last year (difficult to use effectively with the old faded writing/drawings on it). The section towards the front of the room, near the SMART Board, could stand to be replaced with a magnetic dry erase whiteboard. That’s not something I can install myself though. A LEGO Wall on the other hand? I can do that!
Time-lapse video of the install and some examples of extra things you can do with a LEGO Wall are included below. Please read on for more information about this LEGO Wall!

Take Two
This is the second time I have put up a LEGO Wall. This one is the first at this school, and the first one I have done by myself. Since it has been a while, I went through all of the excellent resources online to make sure I had everything fresh in my mind before doing any of the installation. Well, first I asked for permission to even put up the wall…let’s be clear about that! I made a mock-up of what baseplates would look like covering that section and I detailed the potential costs.
For the record, I love original LEGO brand baseplates and would have enjoyed using them, but the gaps created with them in a wall build is a bit greater than what I preferred and they were too expensive for this large space. Originally, I selected a generic baseplate because of the lack of rounded corners (rounded corners leave gaps where plates meet). That was important to me for the aesthetics (no large gaps), but it is all a personal preference. Again, keep the original brand-name plates in mind if you can afford to do so and like the look of it. You can always paint the area behind the baseplates, if needed.
I had already purchased a pack of generic baseplates during Amazon Prime Day, planning to use it for other projects (including adding magnets to the baseplates as a test), so I fully expected to be able to roll that pack into the new LEGO Wall. Unfortunately, after those baseplates came I discovered that while they fit together extremely well (no gaps whatsoever) and appeared sturdy, they had the company name written out across studs on each side of the plate. I found it distracting when I was up close to the baseplate (especially since it was on all sides), so I figured it was not a good candidate for the wall project. Between receiving approval and testing out the first pack of baseplates that had arrived from Prime Day, I came across a second baseplate option.
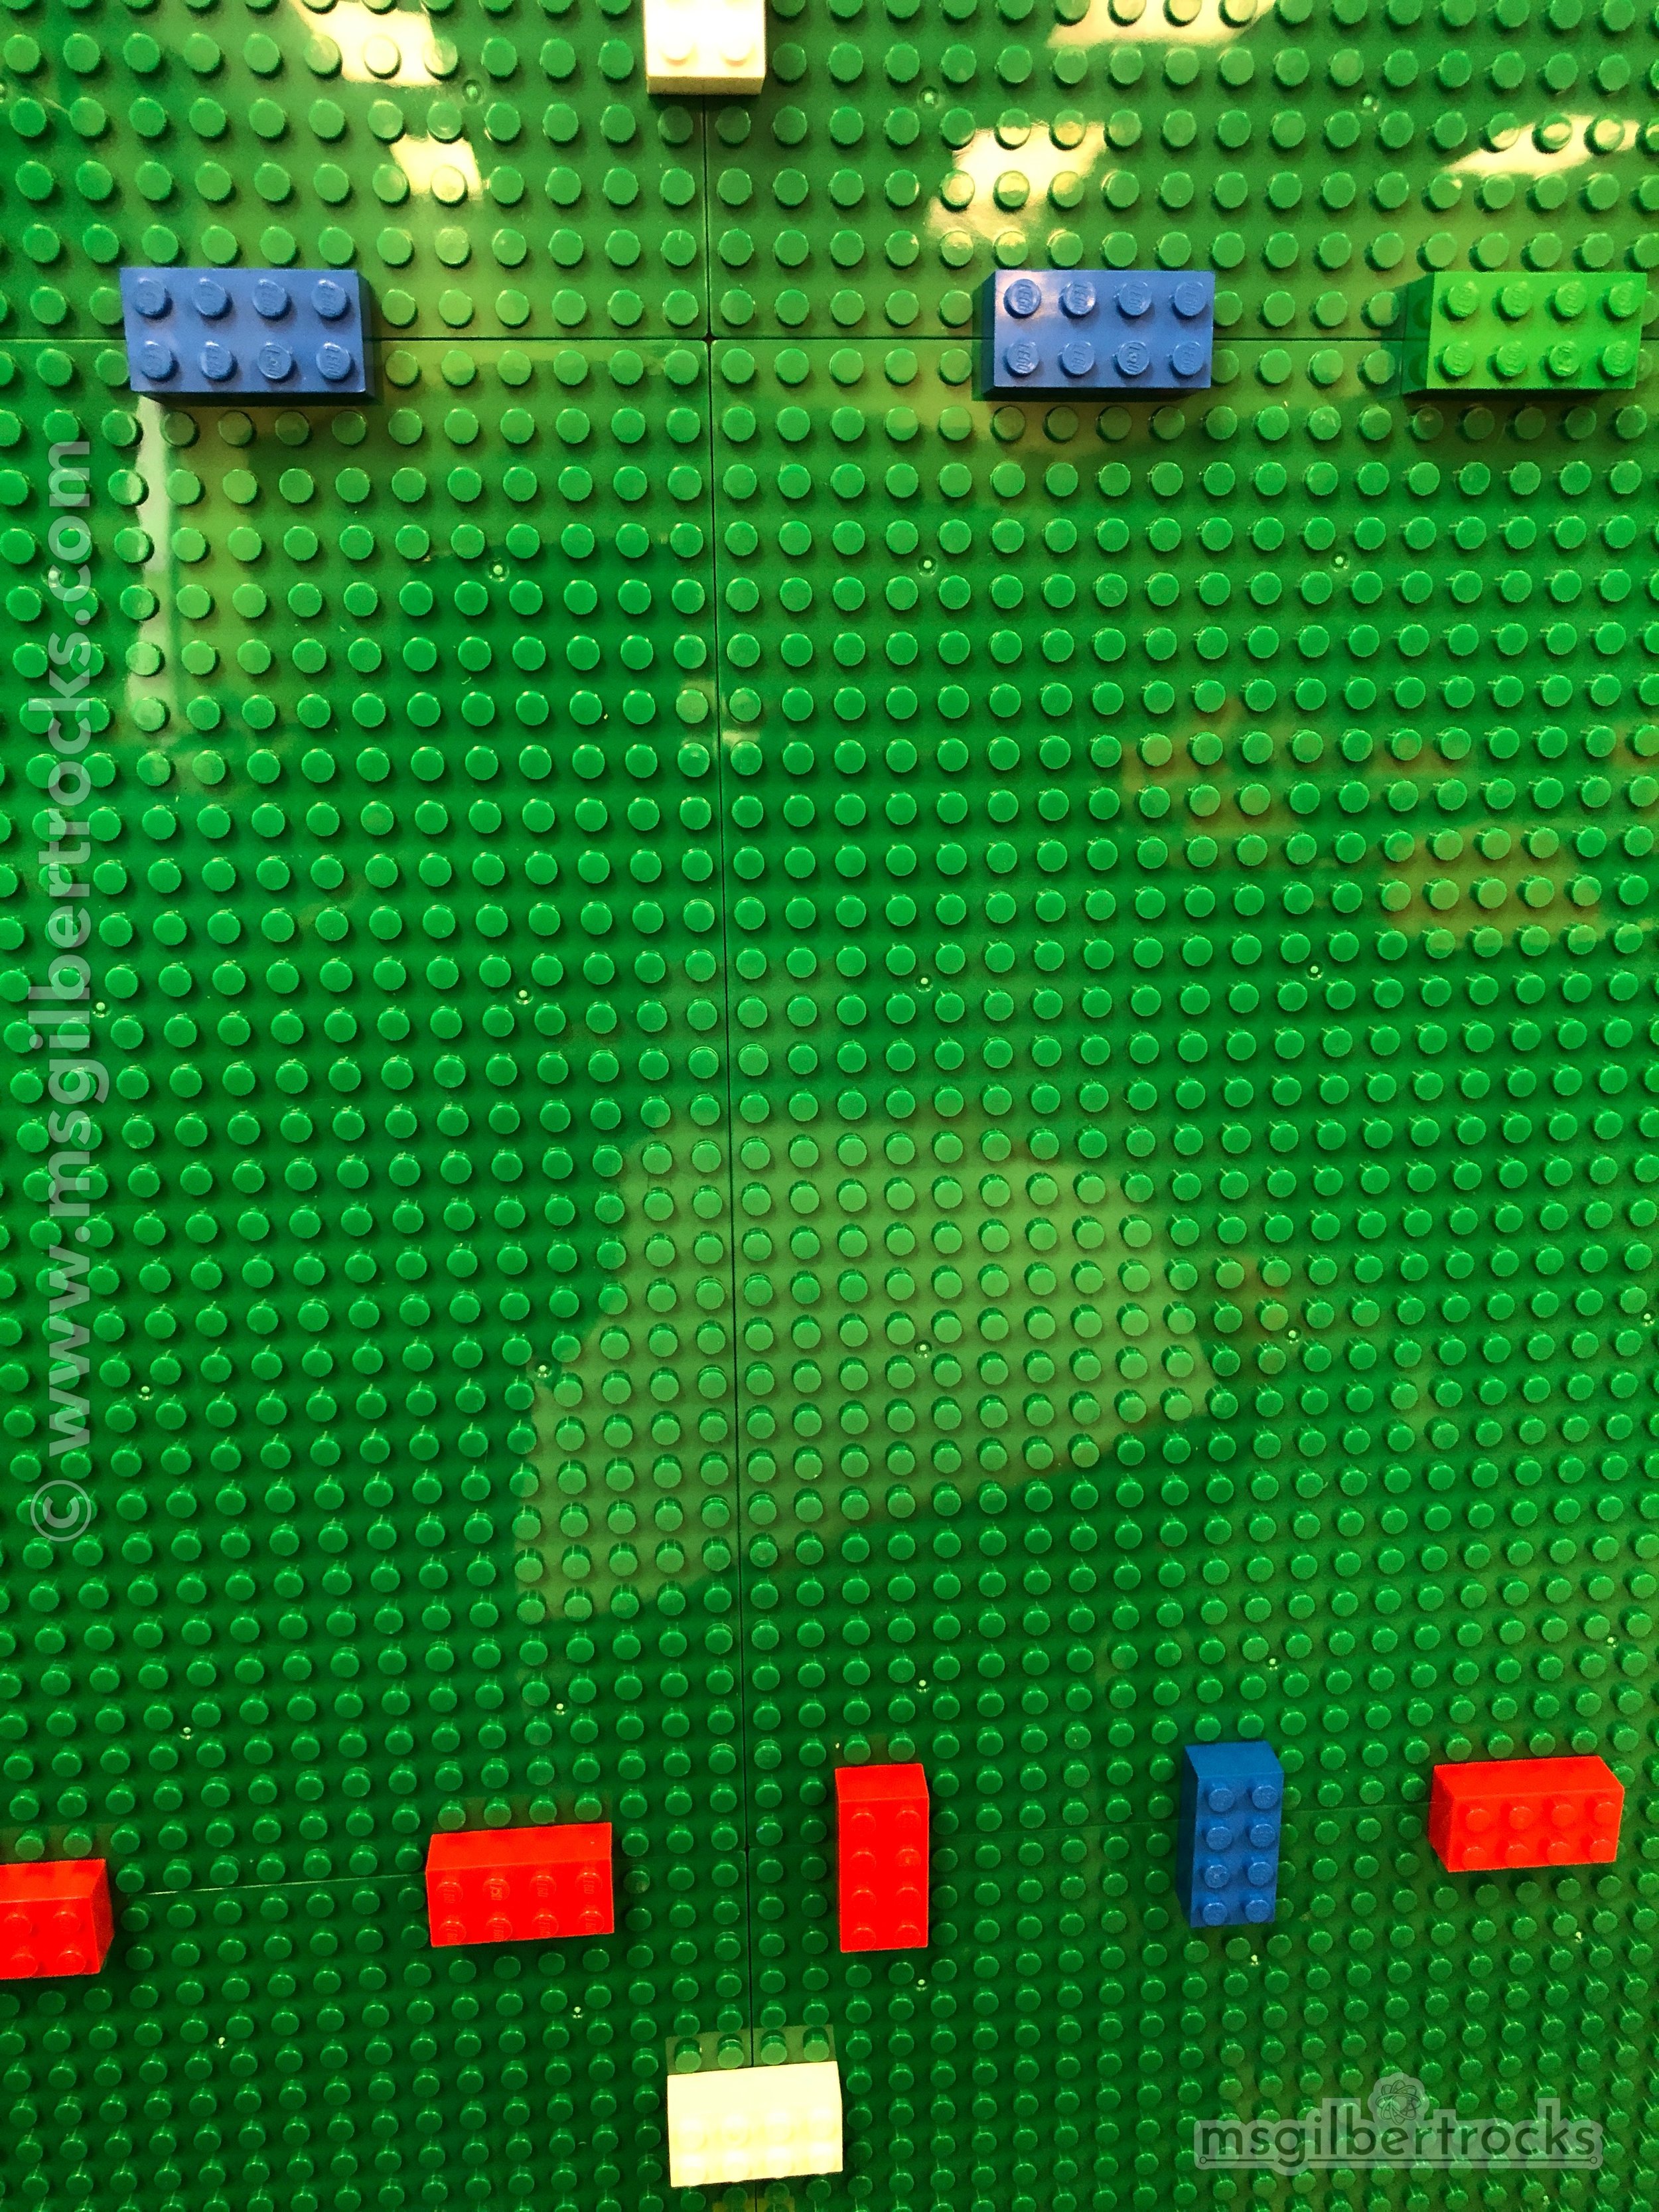
This second baseplate option, that I ultimately went with, does have slightly rounded corners. You can see that the gap is not significant and blends in when you back away a bit from the wall (remember there is a green chalkboard behind the baseplates!). The baseplates do not have a bottom stacking option and they are thinner than the first one I checked out. This turns out to be a better option for the area we are using since they will fit nicely on the chalkboard without jutting out too much. This particularly baseplate option also had more plates for less money. Even though I had approval to spend more and get reimbursed, who doesn’t like to save money?? 6 baseplates come in a pack for $12.99. (find them on Amazon) There were fewer color options but I was going with green from the start. I was extremely fortunate to get a donation from ChemLink of their non-toxic building adhesive: BuildSecure (find in on this Green Building Supply site). Without any costs for the adhesive, this project was incredibly affordable.

Here is a list of my final materials (total cost for the wall was just the cost of baseplates):
8 packs of baseplates (6 plates per pack, green, total of 48 baseplates) cost $12.99 x 8 packs = $103.92 - free shipping because, Amazon :)
BuildSecure adhesive (donated, no cost)
Caulk Gun (to apply adhesive) (borrowed, no cost)
Small level (see “method used for install” below for why it is needed)
Bricks to secure plates and line them up properly (had in the classroom)
TOTAL COST = $103.92

Get ‘er done
Once all of the baseplates arrived, I planned out the best days to get everything up to allow for drying time over some cooler evenings/days. The classroom can be warm and stuffy so I figured the milder weather would give the adhesive the best chance to dry and cure. I did go in a day or two before my install window to clean the chalkboard to make sure it was prepped and ready. At that time I also sorted the small amount of LEGO bricks we have in our classroom to pull out the 2x8 bricks (and similar) that would be best for connecting the baseplates during the installation and for the time that they are drying. It helps to plan ahead of time so you know if you will have enough bricks to line up the plates properly. Once the chalkboard was dry (I was working on other things in the classroom), I went ahead and laid out the baseplates to see how they fit. Checking the baseplates by putting them up with painter’s tape allowed me to do two things:
Revise my original plan where I would start at the far left and fill to the right
Discover a pack of baseplates that had a lighter shade of green
Resolving problems
When I tested the baseplates starting at the far left of the chalkboard I found that the aluminum trim piece did not seem to be perfectly straight. However, the smaller trim piece on the far right of the chalkboard was straight. That thin piece separates the two sections of chalkboard on that wall. With the revised plan I would have a gap on the far left side and be able to cut baseplates to fit that area (different widths, if needed). As for the lighter green pieces, the company had wonderful customer service and promised to get a new pack of baseplates out to me once they were back in stock (of course they would have to be out of stock as soon as I was ready!).
Back on track
Once I was ready for the install I set up my phone to record time-lapse video…and everything went smoothly…psych! Fun fact: the adhesive tubes need you to load them into the caulk gun, cut off the tip, AND poke a hole in through that end. Live and learn. A pencil did the trick to fit through the tip of the adhesive tube and I was able to restart the time-lapse for the actual install. Seriously, this took a bunch of time to figure out. Like an embarrassing amount of time. I hope it helps someone else reading this!

Method used for install
Most of the advice for installing a LEGO wall is the same. You will find variations of course, but I decided to go with the standard construction adhesive/secure directly on the surface method. A small level is extremely handy because you want to get your first row, the bottom row, level so the rest of the plates that attach to them are aligned properly. I did not do a great job with the adhesive for that first row, so I will not be too surprised if that is the first area to loosen and require some reattaching (who knows how long until it shows wear and tear).
You should have your 2x8 bricks (or similar) out and ready as you start this first row. The chalk tray was awesome for this! You can see in the time-lapse video that I had all of the pieces spread out there and easily accessible. Off camera I have a table with the adhesive in a caulk gun and the baseplates stacked up ready to go. I laid out a few baseplates upside down on the table, but only applied adhesive to one at a time. I made a square (ish) bead of adhesive around the whole plate, but left a margin of a few studs worth of space empty to prevent adhesive from oozing between plates. I also made an “X” of adhesive inside the box and then dotted other open places inside the box with adhesive. It wasn’t always pretty. At least twice I got a little too close to the edges and had to wipe away the excess before placing bricks across the gaps. The most nerve-wracking part of the install is that first row. It takes the most time since you should check the leveling as you go. I checked both the top and side before I moved on to the next baseplate, going across the bottom row from right to left. As I went along I did get better at pressing the baseplates down on the chalkboard for a moment, trying to get a good spread for the contact with adhesive on the back of the plate. One excellent piece of advice for keeping your wall aligned well as you go is to connect your baseplates at the corner where they all meet first. This helps pull the plate being added into a row/column right in line with the rest. This still works with the first row, even though there is nothing else on top to connect. Once you get the second row going it makes a huge difference grabbing those plates and getting them aligned right away. I went back and forth on the number of bricks I used during this alignment process for the install. By the end I just added all of them to make sure the baseplates would not have any excuse to get skewed or pull up before having a chance to dry.

Sized to fit
I considered other options for the leftover space on the far left and top of the board, but the plan was always to go as close to the edge as possible. The number of baseplates ordered factored in going as close to the edge as possible. Again, this can be a preference and is mostly for aesthetics at the top of the build. It is easy enough to cut baseplates, but I did have some trouble keeping the cut line straight. You can use an X-ACTO knife or box cutter (something like those) to score the plates. I used different brick pieces to make the straight barrier for the cut. Some were other baseplates and some were long skinny 1 x 16 pieces. Cutting straight was a challenge for me with all combinations of blades and bricks as barriers. Clearly it is a human-error issue! This video by Bricksie on YouTube shows a method for cutting. You can find other videos or descriptions like this one written up on a blog.
Resources
One of the resources I always refer to is the fabulous Diana Rendina’s “Renovated Learning” site. She has detailed the experience of putting up a large LEGO wall, gathered images of other similar projects, and updated readers on how she maintains the wall. It was helpful back when I was involved with the first LEGO Wall build years ago and continues to be an excellent guide. Those resources are below:
Original 2014 post by Diana Rendina
Update that shares other LEGO wall builds by Diana Rendina
How to Repair a LEGO Wall by Diana Rendina
Watch Joe Slifka, a fellow LEGO Master Educator, put up a small wall in this video. Note how he tapes the bottom row to let it dry. Your whole wall can slide down if you try to move on to a second row before the first is secure. In my build I have the existing trim for the chalkboard and chalkboard tray. The bottom (where the tray meets the board) allowed me to keep the baseplates contained without worrying about them sliding down. I did pause for a bit (15-20 minutes) after the first row though.


Final thoughts
Do not be afraid to search around for resources to help you bring your own vision to life. Sometimes a LEGO table works better in a space, or you have a portable easel/whiteboard type piece that could have baseplates added. One of the reasons I love the space we are using in our classroom is the fact that it is accessible to kids both sitting and standing. They can reach every part of the wall comfortably. Our wall is almost 9.5 baseplates wide and slightly over 4 baseplates tall. We do not have a ton of LEGO in our classroom, but we can always add more over time. That should not be a limiting factor if you are considering adding a LEGO learning space with a wall or table build. In addition to being a fun and playful space, I know I am planning to use the LEGO Wall as a teaching tool as well. I can use it in math as-is and will include some LEGO number lines at some point (using studs on plates/bricks). It is a sturdy space for stop motion animation with LEGO. This incredible 3D printed marble wall chute design by Rob Morrill was shared on Twitter (from Thingiverse) and I cannot wait to try it out on the wall. Another benefit of going with green for the baseplates is that we can use the wall for some green screen applications. It is not the most ideal green screen (very reflective surface and obviously bumpy with the studs), but we will definitely put it to use as one from time to time!
While the LEGO Wall will not last forever it will certainly get put to use for a number of activities throughout the year. Updates will be posted as I need to do maintenance on the wall or have additional samples of work to share.
See examples of stop motion animation using Stop Motion Studio (iOS, Android) and the green screen effect using DoInk (iOS) on the wall, all shot on my phone. I love both of those apps. I do have the paid DoInk app and thoroughly enjoy it. Stop Motion Studio is worth paying for, but I have the free version on my phone. Video clips and images were compiled in iMovie. None of the native green screen options for iMovie were used in the samples, but that is another option you can test out!
Do you have a creative space for a LEGO Wall? How have you used it in your learning space? Leave a comment or send me a message to share how you infuse LEGO Learning into your classroom or other learning space!
Update 8/12/19: Marble Chutes from Thingiverse tested on the wall! Press the square connector, not the chute, to attach (Rob’s advice…I forgot and cracked one the first day). Clear excess PLA nibs from inside the square connector, if needed. Did this on a few just with tweezers. The chutes should attach securely to the baseplates. See photos and video below.

