Laser Cut Pencil Cup with Tray
Ever have an idea in mind for a product you would like to use in your classroom but you just cannot find the right thing available to purchase? Why not consider making it yourself!

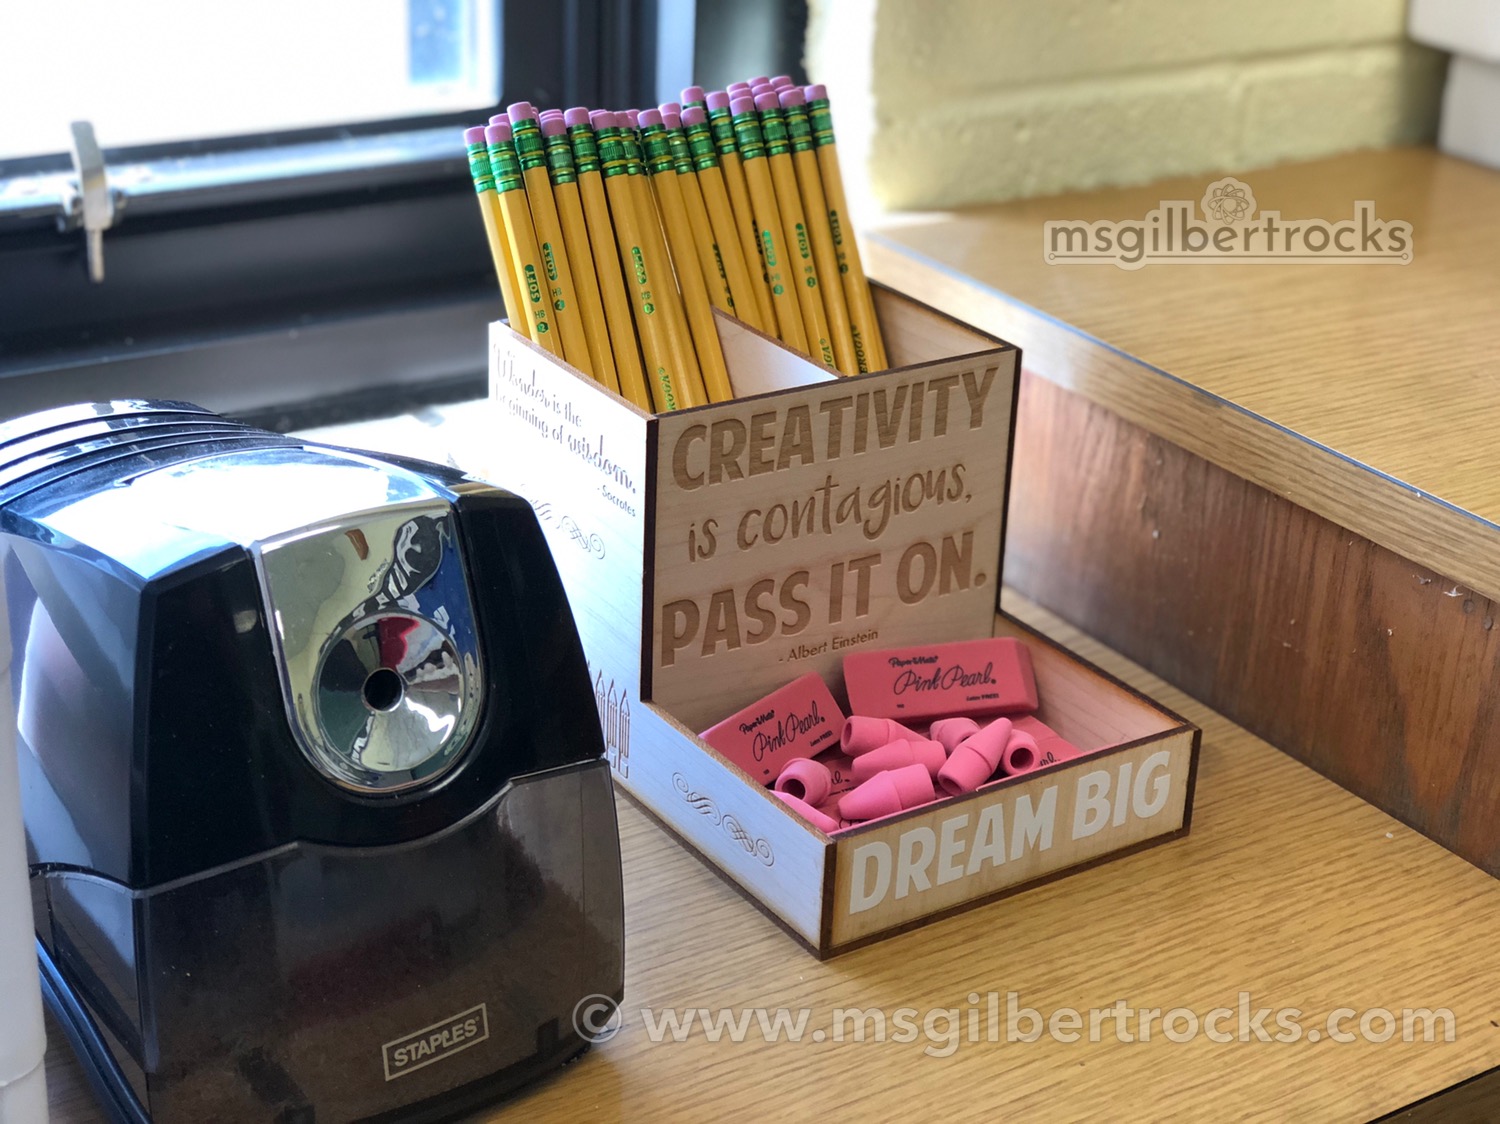
I do not love the idea that I have so many cheap plastic storage options for my classroom, but they are just that - cheap plastic. When I wanted to re-imagine the pencil and eraser storage in the back of our classroom I knew what I wanted: a single piece with one or two areas for pencils and an attached smaller tray to hold erasers. I also wanted it to be made of wood. After searching Amazon and local retail stores I decided that nothing fit the picture I had in my head.
Dream it, Build it
Since I was looking for an excuse to try a new (to me) laser cutter at a local library, I decided to go all in with their materials. After checking in with the staff I determined that I would be using 6” x 12” sheets of 1/8” maple wood. That was an important detail since I struggle to put together the measurements of three dimensional shapes when building. I could not use an online generator to create a simple box since I wanted to have a divider and the tray for erasers. With some back and forth in my head I tried to narrow down my limiting factors. The dimensions of the wood determined the dimensions of my largest pieces and I had to calculate how many pieces of wood I was willing to purchase to make this come to life. I decided that if it could fit on three sheets of wood then I would be happy with a custom laser cut design that cost me less than $9 (just under $3 for each piece of wood).


Normally, I start my design work digitally. I have used everything from Google Drawings to Adobe Illustrator in order to create something I picture in my head for printing (Drawings) or etching/cutting (Illustrator). This time around I knew I needed to start with something more tangible to actually SEE the piece come to life. I measured out different options on paper and settled on them. Once I picked the overall dimensions I began to look at how to lay out the pieces themselves. The design itself consists of seven pieces: bottom, left and right sides, front and back of the pencil cup, the divider in the pencil cup, and the front of the eraser tray. I realized that the sides could be a contiguous piece, somewhat of an “L” shape with the taller portion accommodating the pencil cup and the shorter portion making up the tray.

Once I had all of the pieces measured out on paper at their actual size I cut them out of card stock to try to arrange them for each of the jobs on the three pieces of wood. At this point I could have gone right to the digital designing portion, but I continued on paper just to get a good grip on the design itself. I photographed the potential layouts so I could refer back to them and then I assembled the paper model using small pieces of painter’s tape to hold it together. I labeled each piece with the dimensions prior to putting it together. At this point I also realized that due to my layout for cutting the sides I could not etch them both in the same job - one side piece would have the inside facing up while the other had the outside facing up, available for etching. I knew I could flip the piece over after the initial job and etch on the proper side, but I decided to leave some surfaces blank. I used two of the blank surfaces to apply vinyl cut designs.
This one project will give me the ability to share the design process with students through my own experiences, and the physical model in addition to the completed design. That finished design is not only practical but it provides examples of laser cutting, etching, vinyl cutting and design of two dimensional properties to three dimensional building (putting the pieces together to form something specific).

Find the files on Thingiverse (https://www.thingiverse.com/thing:3723735) and please use proper attribution when making one or remixing it. Looking forward to seeing what you create!