LEGO Learning Kits
Permission to fail is an important gift to give yourself. In giving yourself that permission, you open yourself up to numerous opportunities for learning. Without trying and failing you would not know success, or even in my opinion, have as much joy in teaching. One of the best ways to bring in the concept of “failing forward” (i.e., trying something and continuously iterating) is to use the Engineering Design Process.
In working with middle school students to understand and practice problem solving with the Engineering Design Process, LEGO solutions are some of my favorite tools to use. While we had a great start with our Simple & Powered Machines kits last year, that has not been an option in our current landscape. Since my goal is to focus more on playful learning, and using hands-on materials as more manipulatives than cookie-cutter design projects, I looked to LEGO Education for advice on bringing the playful learning component into this virtual setting.
Ducks, kits, and playful learning
As a teacher working exclusively in the distance learning format, I have a number of limitations but I see those as opportunities to try things in a new way. Right off the bat I knew that the individual LEGO Learning Kits would be an excellent way to just get started and try something out within my small group of 6-9 students in a cost effective way.
Every year we would typically do the “build a duck” activity within our science classes so I could introduce the idea of using LEGO bricks to express ideas and showcase how everyone sees things in their own unique way (no two ducks are ever alike!). It is something I look forward to each year and our 8th graders can take the lead on their second round of duck building in our blended 7th/8th grade classes. Part of the magic in building ducks is that the activity uses the same basic set of six bricks and the rest is up to the individual and their imagination. This activity is often a challenge for our linear, direction-following students…because there are no instructions. There is no right (or wrong) way to build a duck. These individual LEGO Learning Kits will give us the chance to expand on the principles of playful learning and abstract thinking that are central to the duck build.
Playful learning allows students to express themselves and their ideas. My goal will be to use a combination of existing resources and weave our time with the kits into our existing goals around visualizing, verbalizing, and writing.
The original inventory breakdown (shown at the bottom of this post) that was used for kit creation was shared by a lovely representative from LEGO Education named Stef. All of my work is based on the foundation that she set up to create 20 sets of bricks for individual learning kits from these materials.
Kit Creation
We used the Creative LEGO Brick Set by LEGO® Education (45020) and these minifigure sets: Fantasy Minifigure Set by LEGO® Education (45023) and Community Minifigure Set by LEGO® Education (45022). These minifigure sets may have been retired by LEGO since they are no longer showing on the LEGO Education site as of January 2021. We purchased enough materials for 10 complete kits to start.
Additionally, the bins themselves were purchased from Dollar Tree along with the small baseplates. There were limited colors of the baseplates and color scheme for many items at Dollar Tree likely changes with seasons, hence the plethora of orange between baseplates and container lids! The bins (“Sure Fresh Professional” container with vent lid - 9.54 cups, 76.36 fl oz, 2250 mL) do not currently show up online, but any bin that meets your criteria will do. For me it was important to have the baseplate fit flat inside the bin and have the ability to have built components placed back in the bin with ease. If these things are not important to you then you have a wide variety of options to choose from through Dollar Tree. I did glue the vent portion of the lid even though it was concealed under the inventory topper page.
Due to the makeup of the creative brick pack and our configuration choice for the kits, there are enough pieces to make 20 partial kits. 16-18 of the kits would have the same general composition, but in changing one key component (number of 2x4’s), we would need to add a handful of bricks to complete the remaining sets. If color matters to the makeup of the six-brick set (the 2x4’s), then the quantity of extra bricks increases. Fortunately, my first 10 will have the ideal configuration to test out and further decisions would not need to be made unless/until we decide to expand the number of kits. We chose to go with both sets of minifigures and distribute one each from the community and fantasy set respectively, so students receive a total of two minifigures and their accompanying accessories.

The detailed breakdown of the kit inventory is shared below. Putting the kits together was a process that I broke into four phases. The time for each step is listed below the phases. Please note that it would take less time to complete each portion if you are not documenting the process the way I was with photos/videos and jotting notes!
Phase 1: sorting of all the bricks from the Creative LEGO Brick Set (45020) and distributing to each kit.
Phase 2: separating out the three extra pieces that would be added to each kit and tracking them for inventory purposes.
Phase 3: minifigures built, sorted, inventoried and distributed to kits.
Phase 4: all steps related to the bins including the inventory sheet for the top of the bin and labeling each bin with the kit number using custom vinyl.


Time for each step (done across several days in my “spare” time so I could document properly):
Sorting the bricks took approximately 1 hour. I used the 10 empty bins that would eventually hold the kits and needed a couple extras to hold the 14 unique types of bricks (brick separators not counted in this since there are only 2 total and they are not part of the distribution). I labeled each container for the 14 unique types of bricks (e.g., 1x1, 2x4) using a small piece of painter’s tape.
Distributing the bricks to match my inventory configuration took just under 1 hour. I used 20 dog-safe flying discs…because, why not?! They were perfect for containing the bricks and I stuck a post-it note on each disc so I could easily track the full kits vs. the partials at the end. The remaining bricks for the partial kits were bagged with the post-it note to set aside for a time when we add to our kits.
Distributing the 3 “extra pieces” that are unique to each set took roughly 20 minutes. I was intentional with my choices and recorded which 3 pieces went into each of the first 10 kits for inventory purposes. I matched the 3 extra pieces across two different kits in the first 10 so we can use that as a partner matching activity to separate into pairs (find the person who has the same 3 extra pieces as you). For the remaining partial kits I used smaller snack sized baggies to contain sets of 3 extra pieces so they can be matched up later if we are adding to our kits.
Building the 21 minifigures with accessories in the Community and Fantasy set took 1 hour and 20 minutes and 1 hour and 10 minutes respectively. There are no build instructions for the minifigure accessories so some of them required a bit of extra time to figure out based on the card for each character. For the second set it took slightly less time since I had worked out a system the first time around. I found it helpful to sort the components into separate areas of the workspace so I could easily differentiate what was needed for each character. I did remove any weapons to be consistent with school policies and your mileage may vary with those items. I felt it was okay to keep them out this round and can always go back to add them in later.
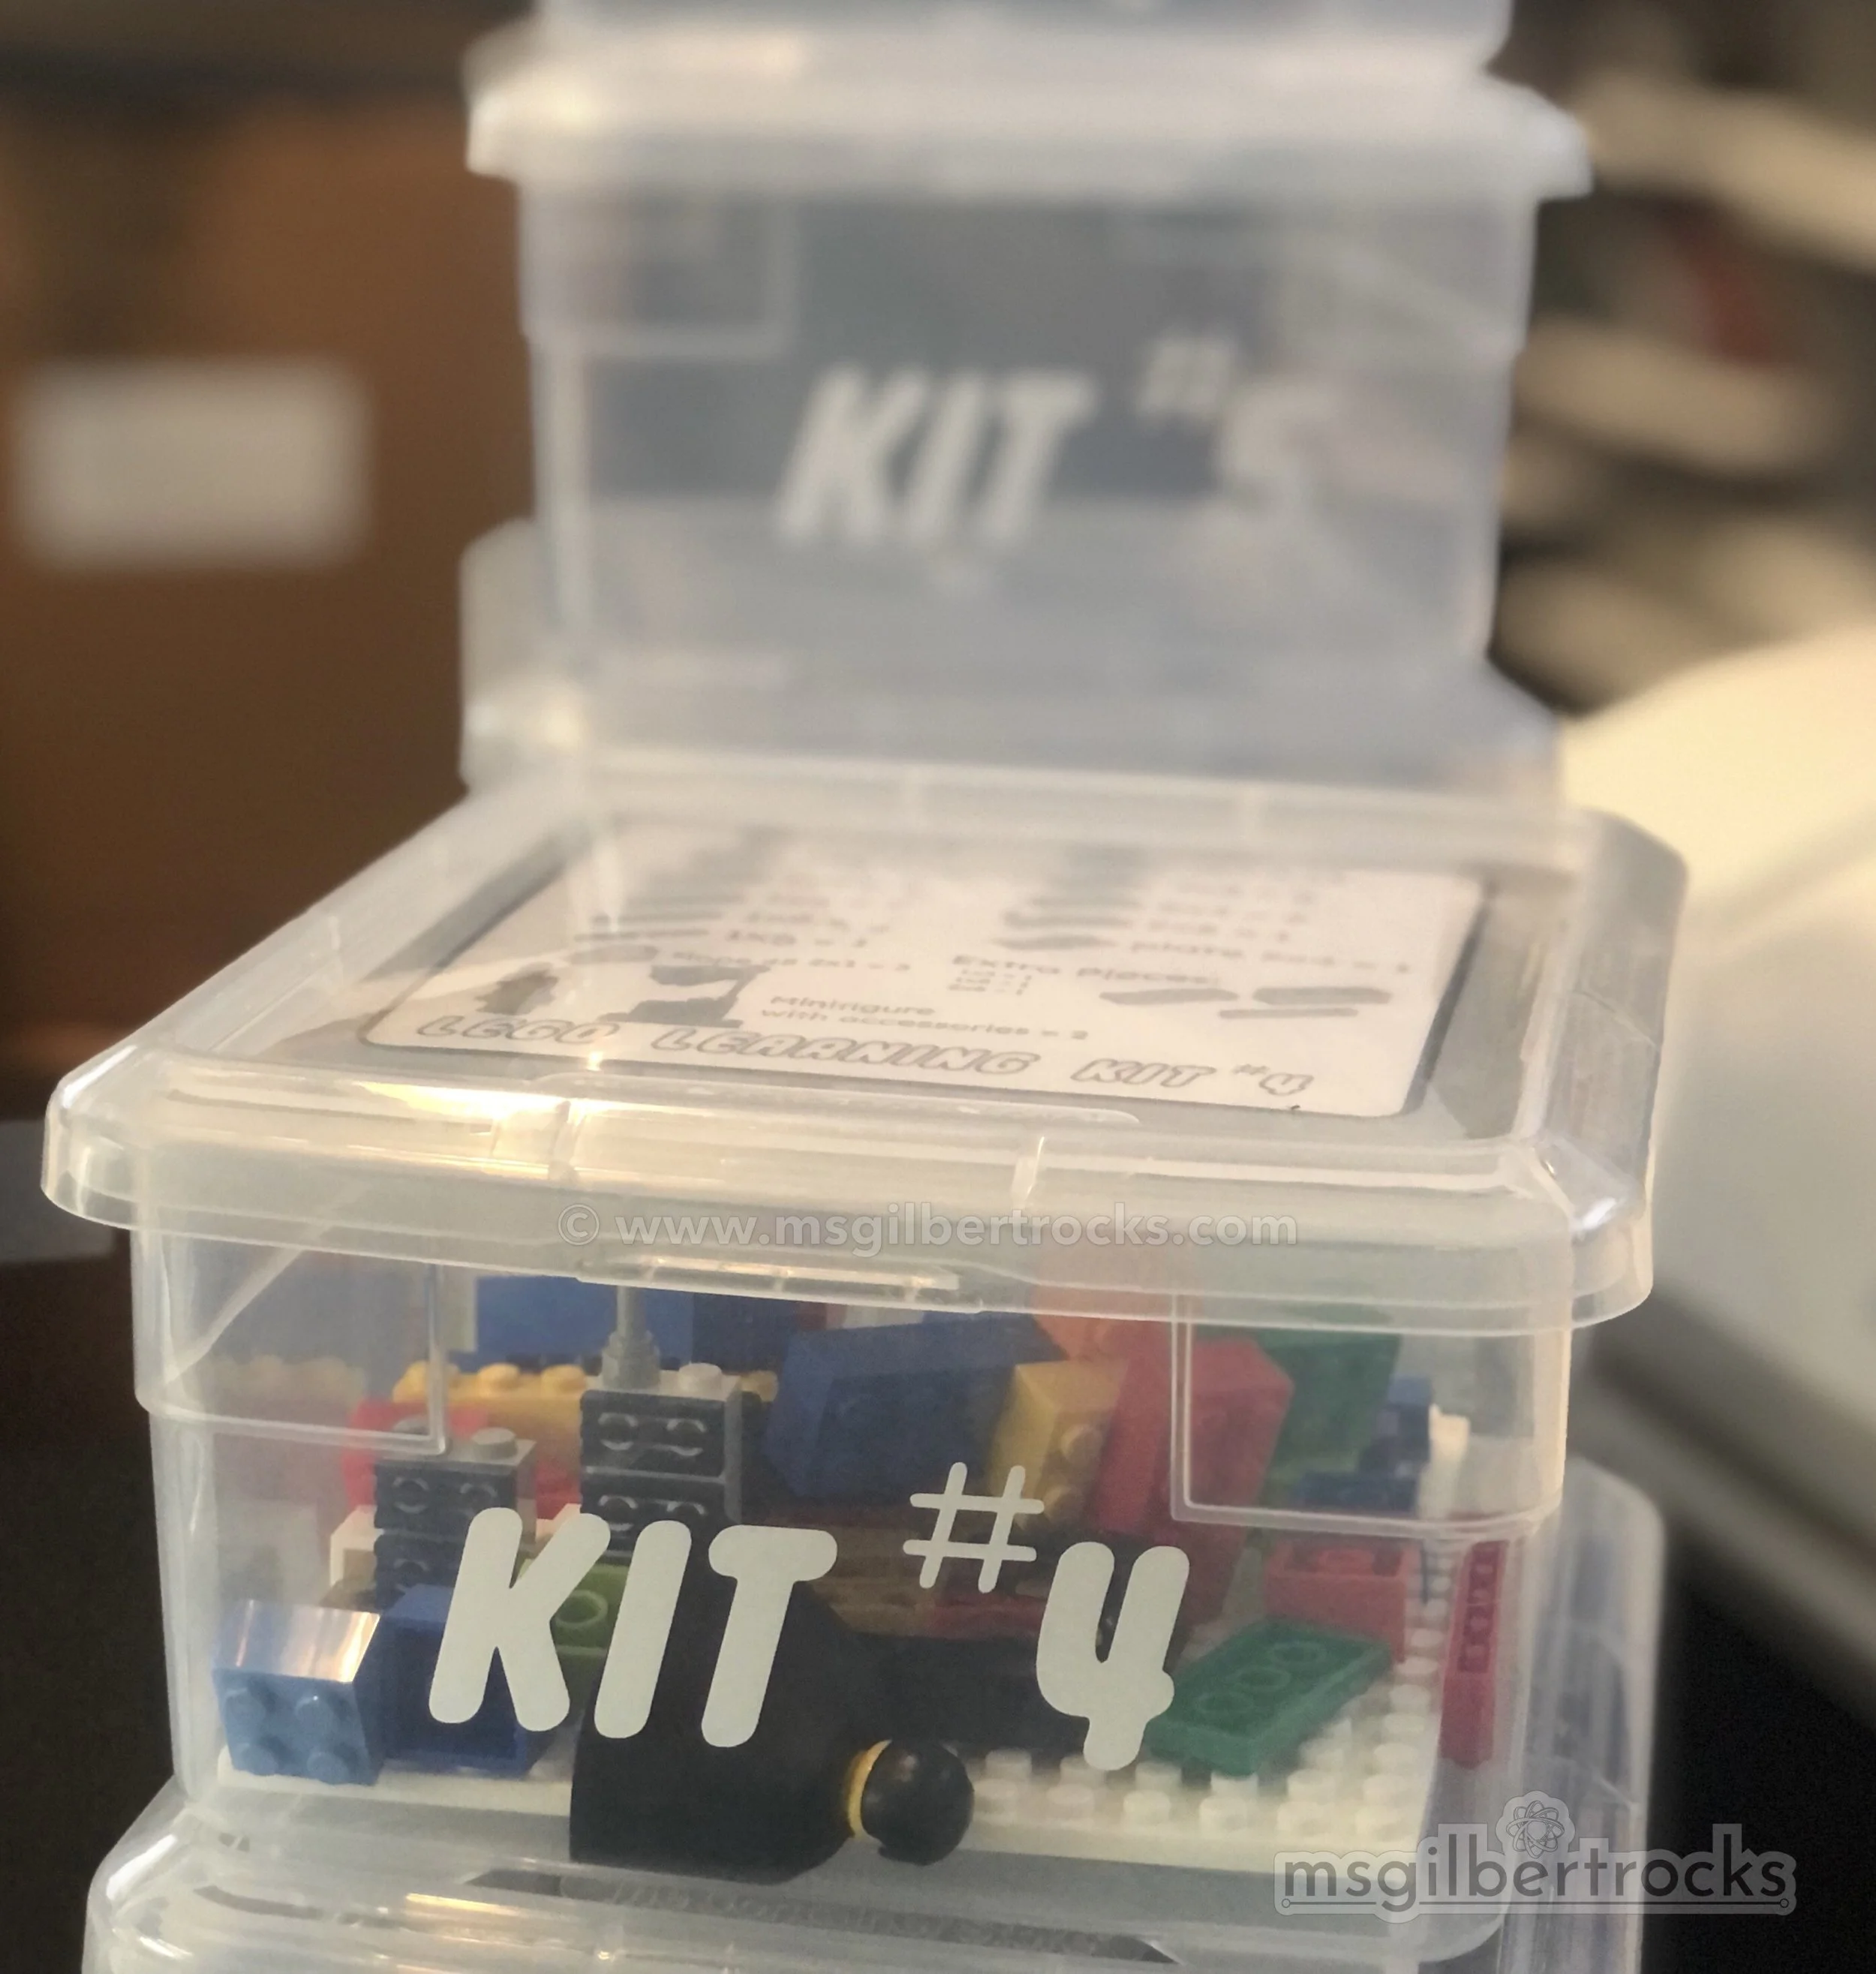
Time was not well tracked for the additional items I chose to do as part of our system. These steps are not necessary, but are included here since it was part of my process. I created a visual inventory page in Silhouette Studio so I could use the print and cut feature to make them fit properly on the lid of the bin. I printed and cut the inventory pages (just kits 1-10), laminated them, trimmed them, and rounded their corners before hot gluing them to the top of each bin lid. I used a heat gun to cleanly peel the labels off of the bins and cleaned them with a bit of rubbing alcohol before applying the custom vinyl with each kit number to the appropriate bin. While the bins met all of the requirements, if budget was not an issue then I would go with something more sturdy and stackable in the future. The least expensive component of this entire project was the bin and small baseplate ($1 each) from Dollar Tree where we spent a total of $20 for the 10 full kits that were planned. Again, you can cut out just about all of this last step if these are not concerns for you. A plastic baggie would work just fine and you only need the visual inventory if it is helpful for your students or you are requesting that the kits be returned (we are).
There are no inventory pages and extra pieces/minifigures have not been assigned to any other kits past the first 10. All of the remaining components from this order are stored in a single shoebox sized container. I photographed every minifigure in a “lightbox” (pieces of lightweight cardstock taped together) using my phone on a tripod. These photos were used as part of the inventory page that was laminated and hot glued to the top of each bin.
Inventory information is available in the spreadsheet below (note 3 different tabs within the document). In the future we can expand these kits by adding more pieces (even DUPLO) or minifigures to the existing kits and creating even more kits to join our first 10.
Stay tuned for updates as these activities get underway with exploring the kits/vocabulary of bricks (e.g., what does 1x1 or 2x4 mean??) and an introductory six brick activity. Please contact me if anything in the spreadsheet does not make sense or you cannot access a file that is listed below.


LEGO Learning Kit Inventory Breakdown via spreadsheet is shown immediately below this section of text (click here to make a copy of this spreadsheet). If you are interested in the BuildToExpress Build Statements that I plan to pull from, you can make a copy of that sortable list here. Finally, make a copy of the kit agreement (in Google Slides, so please feel free to edit the copy to suit your needs) we used to introduce the kits and try to ensure they come back to us complete at the end of the year!
Additional files from the LEGO Learning Kit adventure include the PDFs (freely available from LEGO) that are shown below in a shared Google Drive folder. I will be using a combination of six bricks activities, BuildToExpress statements, and the SEL “Ready To Learn” curriculum. The twelve brick activity guide is also included. We will be using some combination of the six and twelve brick concepts with standard LEGO bricks (not DUPLO).
Updated resources:
December 2020 - Make a copy of the LEGO Minifigure Trading Cards (version 1) student file in Slides. This sample activity includes a screencast with me talking through the directions. Feel free to use it or replace with your own! Two examples of student work are included below. Make a copy of the writing prompt for a minifigure “backstory” that can accompany the trading cards activity or be used as a stand-alone. Note that this can work for any minifigure they happen to have at home even if you did not send kits home. Feel free to adapt or modify to suit your own needs.
April 2021 - Make a copy of the LEGO Learning Kits: Build The Setting activity in Google Docs. Be sure to change the directions to fit your needs. We completed the activity for a class novel (Stargirl) using the individual LEGO Learning Kits. This activity uses symbolic representation based on the Six Bricks activity “Creative Creatures” on page 10 of the Six Bricks Activity Cards PDF (shared above as well). This activity was done as an assignment throughout a week of assessments when no other homework was given. There was no written output, but each student presented their photo/scene to the class over Zoom and demonstrated an excellent understanding of the story. It was a perfect mix of open-ended and novel-related work that gave them the opportunity to show what they know in a creative way. I regret that I did not think to record the students presenting on Zoom, so consider that if you want to capture some of what they share outside of just having a photo of the build. Photos of the builds along with their descriptions were posted on our class website for families to see. Two examples of student builds are included below. If you are familiar with the book, let me know if you recognize the scenes! Please feel free to adapt and modify the activity to work for you. As always, reach out with any questions!
June 2021 - The LEGO Learning Kits were a great addition to the year. They were particularly useful for the remote setting since I knew that all students would have access to the same set of materials when it came to the kits. One thing to note is that the bins we used (from Dollar Tree) did not hold up very well. Almost all of them had cracks, chips, and/or holes by the end of the year. Our plan for re-using the kits will include updated bins and re-doing the labeling for the bins as well as the inventory pages. The next bin we will use is the slightly more expensive ($2.19 vs. $1), but far more durable, “Our Accessory Box” from The Container Store. There is never a bad time to use TCS bins (the versions referenced here all play nicely together), so I am looking forward to using one of my favorites (what’s the other? TCS “Our Shoe Box” available individually or as a case!). We anticipate the bins not only lasting longer, but also being far easier to store since they stack nicely. The mini baseplate fits inside the bin and it is tall enough to have some items stay built on the baseplate. Again, if those details (baseplate inside, tall enough for build) are not important to you, then you have a plethora of inexpensive options to contain your kits. The inventory page will not be glued to the top of the box in the next iteration. Photos will be added here as an update once everything is re-labeled.
Minifigure Trading Cards and Build The Setting student examples:


December 2021 - The LEGO Learning Kits needed one adjustment prior to joining the rotation for activities with my students this year. As mentioned in the June 2021 update, the Dollar Tree containers did not fair as well as I would have hoped, so we decided to upgrade them to something far more durable. The upgraded storage is The Container Store “Our Accessory Box” as shared in the update above. The price at the time of this update is now $2.29, but we think they will be the last bin needed to contain these kits. Fortunately, my school was able to purchase the bins and I applied new vinyl and inventory pages over winter break in preparation for starting activities in January 2022. The new inventory pages are smaller (printed at approximately 75% of original size) and I cut them manually this time around instead of using the “print and cut” option with the my Silhouette Cameo. They were laminated and applied to the inside of the lids with clear packing tape. Photos below show the update. One tool that was not mentioned previously is the corner rounder that I love. After the inventory pages were laminated I was able to round the corners for a softer look/feel. I use this tool for many things, particularly laminated projects, when I don’t want sharp corners ruining the aesthetic or potentially injuring anyone. I did use the corner rounder for the original inventory topper on the bins and it was a nice compliment to the rounded edges created with the Silhouette Cameo cutting those from card stock. I am not at all embarrassed to say that I have one of these corner rounders both at home and at school!